
 Twitter
 Slack
Slack RSS
RSS GitHub
Documentation
Basics
Plugins
Advanced
- Detailed result contents
- Configuration Options
- Custom Registries & Airgap Testing
- Using Private Images
- Advanced Customization
Resources
Sonobuoy Plugins
Overview
The main function of Sonobuoy is running plugins; each plugin may run tests or gather data in the cluster.
When you first run Sonobuoy, an aggregator pod is created in the cluster which reads the configuration you’ve chosen and launches each plugin.
The aggregator then waits for each plugin to report results back to it. If the plugin fails to launch correctly or does not report results within the timeout period, an error is recorded.
Plugin Types
There are two types of plugins:
- Job plugins
Job plugins are plugins which only need to run once. The Sonobuoy aggregator will create a single pod for this type of plugin. The Kubernetes E2E plugin is a job-type plugin.
- Daemonset plugins
Daemonset plugins are plugins which need to run on every node, even control-plane nodes. The systemd-logs gatherer is a daemonset-type plugin.
Built-in Plugins
Two plugins are included in the Sonobuoy source code by default:
- Kubernetes end-to-end tests (the e2e plugin)
The upstream Kubernetes repo contains the code for this image. The test image includes all the pieces necessary to run the end-to-end tests (which includes, but is not limited to, the conformance tests). This is the most common plugin run by Sonobuoy and can be tweaked in numerous ways to run the set of tests that you need. See more details about how to use this plugin here.
- systemd-logs gathering plugin
Gathers the latest system logs from each node, using systemd’s journalctl command. The image this plugin uses is built from the
heptio/sonobuoy-plugin-systemd-logs repo.
Specifying Which Plugins To Run
By default both the e2e and systemd-logs plugin are run. If you set --mode=quick only the e2e plugin is run.
Otherwise, you can specify the plugins to run (including custom plugins) by using the --plugin flag. This can accept the path to a plugin defintion file or the name of a built-in plugin. For example:
# Run just the e2e plugin
$ sonobuoy run --plugin e2e

# Run your custom plugin and the systemd-logs gatherer
$ sonobuoy run --plugin customPlugin.yaml --plugin systemd-logs
Note: All of the CLI options impact the generated YAML. If you would like to edit the YAML directly or see the impact your options have on the YAML, use
sonobuoy gen <your options>.
How Plugins Work
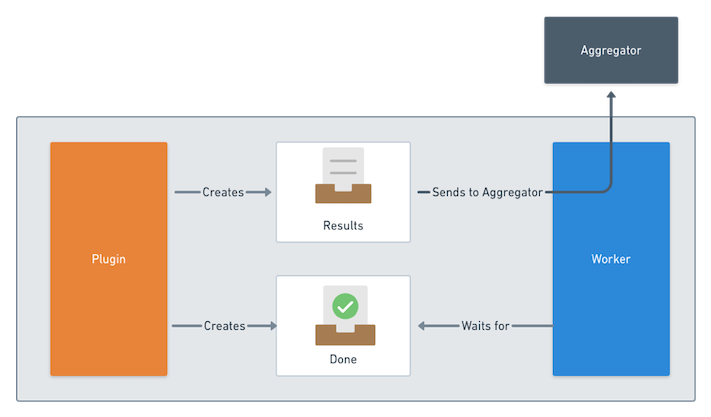
A plugin consists of two parts:
- the core logic which runs tests/gathers data (typically a single container)
- a sidecar added by Sonobuoy which reports the data back to the aggregator
After your container completes its work, it needs to signal to Sonobuoy that
it’s done by writing out the name of the results file into a “done file”. The default
value is /tmp/results/done, which you can configure with the ResultsDir value
in the Sonobuoy config.
The Sonobuoy sidecar waits for the done file to be present, then transmits the indicated
file back to the aggregator.
Writing your own plugin
Use the sonobuoy gen plugin command to help generate the YAML for your plugin definition. Once you’ve saved that YAML locally, you can run your plugin via:
sonobuoy run --plugin myPlugin.yaml
For a thorough walkthrough of how to build a custom plugin from scratch, see our blog post and our example plugins.
Plugin Result Types
When results get transmitted back to the aggregator, Sonobuoy inspects the results in order to present results metadata to the end user such as the number of passed/failed tests or the number of files gathered.
This inspection process is informed by the YAML that described the plugin defintion. The
result-type field can be set to either raw, junit, or manual.
When set to junit, Sonobuoy will look for XML files and process them as junit test results.
When set to raw, Sonobuoy will simply inspect all the files and record the number of files generated.
When set to manual, Sonobuoy will process files that use the Sonobuoy results metadata format.
This option allows you to specify your own results metadata directly, rather than having Sonobuoy generate it.
To use this option, the files to process must be specified directly in result-files array field in the plugin definition, or the plugin must write a sonobuoy_results.yaml file.
To find out more about using this format, see the
results page.
The data that Sonobuoy gathers during this step makes it possible for a user to do a few different tasks:
- get high-level results without even downloading the results tarball via
sonobuoy status --json - get summary information about the run via
sonobuoy results $tarball - get detailed information about each test/file via
sonobuoy results $tarball --mode=detailed
To see more information about how Sonobuoy can process and present your results, see the results page and our previous blog post.
Customizing PodSpec options
By default, Sonobuoy will determine how to create and run the resources required for your plugin.
When creating your own plugins however, you may want additional control over how the plugin is run within your cluster.
To enable this, you can customize the
PodSpec used by Sonobuoy when creating the plugin’s Pods or DaemonSets by supplying a podSpec object within your plugin defition.
The podSpec object corresponds directly to a Kubernetes
PodSpec so any fields that are available there can be set by your plugins.
If a podSpec is provided, Sonobuoy will use it as is, only adding what is necessary for Sonobuoy to run your plugin (such as a Sonobuoy worker container).
Sonobuoy will only ever add to your podSpec definition, it will not remove or override settings within it.
If you don’t need to provide any additional settings, you can omit this object and Sonobuoy will use the defaults.
Providing your own PodSpec
We recommend starting with the default podSpec used by Sonobuoy and then making any necessary modifications.
To view the default podSpec, you can use the flag --show-default-podspec with the gen and gen plugin commands.
When creating a new plugin, you can include the default podSpec in the generated definition as follows:
sonobuoy gen plugin --show-default-podspec -n my-plugin -i my-plugin:latest
This will produce the following plugin definition:
podSpec:
  containers: []
  restartPolicy: Never
  serviceAccountName: sonobuoy-serviceaccount
  tolerations:
  - effect: NoSchedule
    key: node-role.kubernetes.io/master
    operator: Exists
  - key: CriticalAddonsOnly
    operator: Exists
sonobuoy-config:
  driver: Job
  plugin-name: my-plugin
  result-type: my-plugin
spec:
  command:
  - ./run.sh
  image: my-plugin:latest
  name: plugin
  resources: {}
  volumeMounts:
  - mountPath: /tmp/results
    name: results
You are then free to make modifications to the podSpec object as necessary.
If you already have an existing plugin which you would like to customize, you can take the default podSpec, add it to your plugin definition and use it as the basis for customization.
NOTE: The default
podSpecdiffers for Job and DaemonSet plugins. To be sure you are using the appropriate defaults as your starting point, be sure to provide the--typeflag when usingsonobuoy gen plugin.
You can also modify the podSpec from within a Sonobuoy manifest.
By providing the flag --show-default-podspec to sonobuoy gen, the default podSpec for each plugin will be included within the sonobuoy-plugins-cm ConfigMap in the manifest.
NOTE: Modifications to the
podSpecare only persisted within that generated manifest. If you generate a new manifest by runningsonobuoy genagain, you will need to reapply any changes made. We recommend adding your desired customizations to the plugin definition itself.